Creative Clipping
by Rachel Whitcomb
Oct. 29, 2010 - As the season changes, many of us are breaking out our clippers to help keep our horses happy and comfortable while they work through the winter. This year, get creative with your clip job – a little personal style will help brighten up the long indoor months ahead! These instructions are for clipping a design into an unshaved hip (or shoulder, or wherever you like), but if you’re planning a full body clip you can reverse the idea – instead of shaving your design in, leave the hair long by clipping around it.
- Choose your design. Searching for stencils and clip art online is a great place to start. Simple, recognizable shapes are easiest – choose something with bold, clear lines that you could identify from a distance. Your horse’s coat and your skill with your clippers will determine how detailed you can get with your image. The sky’s the limit – do a heart or star, your horse’s name, your favorite mascot, the Eiffel Tower..in the past I’ve done a skull and crossbones – this year I’m going to do a Viking variation on my horse Poe.
-
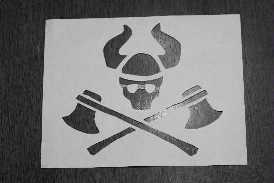
Put the image on paper. You might print out an image you’ve found online or created on your computer, or draw it on paper yourself. Think carefully about the size of your image – you want it to be easily visible, and easy for you to clip onto your horse. Small details likely won’t translate well. I used Photoshop to combine pieces of several different images I liked, colored in small line and shading detail, then enlarged it and printed it out. (Note: If you’re drawing your own image, you can skip to Step 4 and draw it directly on your thicker stencil material.)
Tip: Now is a great time to take your image out to the barn to check the size against your horse – it would be disappointing to arrive with your carefully created stencil, with your clippers at the ready, only to discover your picture looks too small on your horse’s big hip!
- Prepare & cut out your image. If your image is complex, you may have to build bridges between the individual pieces. For my image, I leave bridges from the eyes to the side of the face, and between the eyes for stability. You want your stencil to hold together in one piece – any lines that are too thin may twist, warp, or break.
-
Transfer the image to thin cardboard or heavy cardstock. You want something that has enough give to conform to the contours of your horse, but that’s substantial enough so it won’t tear or crumple while you’re clipping. Cereal boxes work great for this – they’re easy to cut, pliable but durable, and probably already on-hand in your recycling. I recommend tracing your image onto the printed side of the box and planning to have the plain brown side facing you when you clip – this way the print and any stray tracing marks won’t distract you while you’re trying to create a clear image. If you’re using a design where the direction matters (i.e. your horse’s name), make sure you trace it onto the box backwards, so that it reads correctly from the plain side. Carefully cut out your stencil with scissors or a craft knife, then flip it over and lightly shade in any bridges you’ve created to help you remember where they are. Give yourself a pat on the back for making such an awesome stencil!
- Prepare your horse and clippers. Make sure the place where you want to clip your design is clean, and the hair is brushed smooth in the direction it usually lays (especially important if your horse has a thick coat). Check that your clippers are charged (if necessary) and the blades are clean and sharp. I use cordless clippers designed for legs and faces, set to the closest shave. For this detailed work, you’ll want to use the smallest clippers you have available – inexpensive beard trimmers work well too. Introduce your horse to the clippers – make sure he’s comfortable with the sound and feeling of them.
- Clip! Position your stencil (take your time with this) and start clipping. The stencil may shift some as you work, so check your alignment often. Clip off the largest areas first – remember that you can always take more off, but once the hair is gone it’s gone. Brush or blow away the cut hair as you work, and peek under your stencil from time to time to see how it’s going, but don’t worry! Once you’ve clipped off the majority of your stencil, do the detail work – clean up your lines and any stray hairs. The edge of your clipper blade is your best friend for this. You’ll probably have to move the stencil away and do some free-hand work. This is where your image will really start to shine. Remember to clip off any bridges you built to hold your stencil together – check the areas you shaded in step 4 to make sure you got them all.
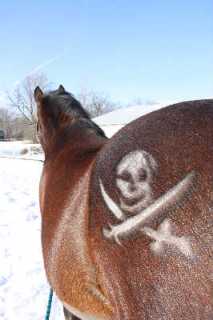
That’s all there is to it. Your design will last as long as your regular trace or body clips do, and this technique works well with summer coats too. Have fun and take a chance – and remember, it always grows back!